From Chaos to Cohesion: Building an Effective Design System
Hi, this article is about my experience in creating a design system from scratch.
In order to decide whether to create a design system that takes time and resources, there are some questions that must be answered.
If you want to read more about the fundamentals of design systems before moving on to this case study, you may find this article helpful.
Followingly, I share a case study that decided into 4 main parts:
- The project definition
- The process
- Design system structure
- The result

✧ The situation:
As a design team, we were responsible for several different products, some of them were established in the market and had daily traction but some of them were under construction or in the design phase. Some of our well-established products inherited legacy designs that have suffered from a lack of consistency over different touchpoints or even writing pages and layouts. Furthermore, they are available in different languages and regions and offer varying levels of functionality based on subscription.

Obviously, Providing any changes was time-consuming and the result wasn't consistent.
✧ Our approach:
In the beginning, we were going to craft a design system for one of our most important products, but we shifted our focus to a bigger objective.

✧ High-level Requirements:
- Both touch-based(e.g. smartphones) and click-based interfaces(e.g. Desktop) must get covered by this design system.
- Converting any legacy design based on this design system should be effortless as possible.
- According to the style guide and brand identity of each product, designers should be able to tailor the design system.
- We need to have a well-documented design system that is supposed to be implemented by front-end developers so it should be easy to maintain and implement.
- We don't need to reinvent the wheel. Take advantage of using any ready resource to accelerate the process.
✧ Time and resources:
During that time, the whole team was overloaded and the complexity of the project made it impossible to consider any available designer for this project. Eventually, I decided to initiate the process and somehow I move onward singlehandedly.
We discussed the timeline with stakeholders including project managers and business owners / technical leads and so on, and they gave me the green light for 3 months (for the designing phase). Right after getting to know the project spec and timebox I start creating a proposal.

I proposed a step-by-step process for crafting a design system from scratch to having components in the development branch:
Step 1: Research and Planning:
The first step is to research and plan the design system. This includes understanding the product, user needs, and business goals. We will need to get to know the scoop and objectives of the design system, identify the components and design tokens that we will need, and determine the development process.
Step 2: Fetch the information about Style Guide / CVI
As you know, the style guide is a comprehensive document that outlines the visual and branding standards for the product. This includes the high-level ideology of brand and product definition and design elements that will be used throughout the design system. It’s important to ensure that the style guide is clear, concise, and easy to follow.
Step 3: Defining the structure
As we discussed, atomic design is the methodology for creating design systems that breaks down components into smaller building blocks. we have to define the structure and hierarchy of elements first.
Step 4: Design and develop
We will start designing the smallest elements, and work our way up to larger components and other more complex elements. In this step, I worked shoulder-to-shoulder with the Dev team to ensure the components' feasibility and double-check the technical standards we considering in the design system.
Step 5: Document and Share
The design system is not complete without proper documentation. Document each component, including how it is used, the design specifications, and any associated code. it’s vital to determine who have access to maintenance of the DES and DEV branch and what is the procedure for updating and iterations.
Step 6: Iterations & updates
The design system should be reviewed and updated on a regular basis or on demand, to ensure that it is meeting the needs of users and the business. This includes testing components, updating documentation, and incorporating feedback from users and stakeholders.
Considering all the above steps, it wasn't that easy to estimate the time of the project. Considering the communication obstacles we might face while fetching information and getting approved by stockholders and etc. I thought it will take roughly 10–12 weeks to finish the first round and deliver the first version of the design system (at the design level). Apart from that the development part is so crucial and it depends on how the dev team can develop fast, we can move forward with testing results and publishing the very first version.

I breakdown the whole structure into three main parts:
- Branding Materials
- Core (including design tokens and general components)
- Product specific components
Like an onion, the whole structure has tiers and hierarchies. Some of this material is nice to have, for example, we can extend the design system into print materials or social media presence, but this is just a possibility, not a necessary option.
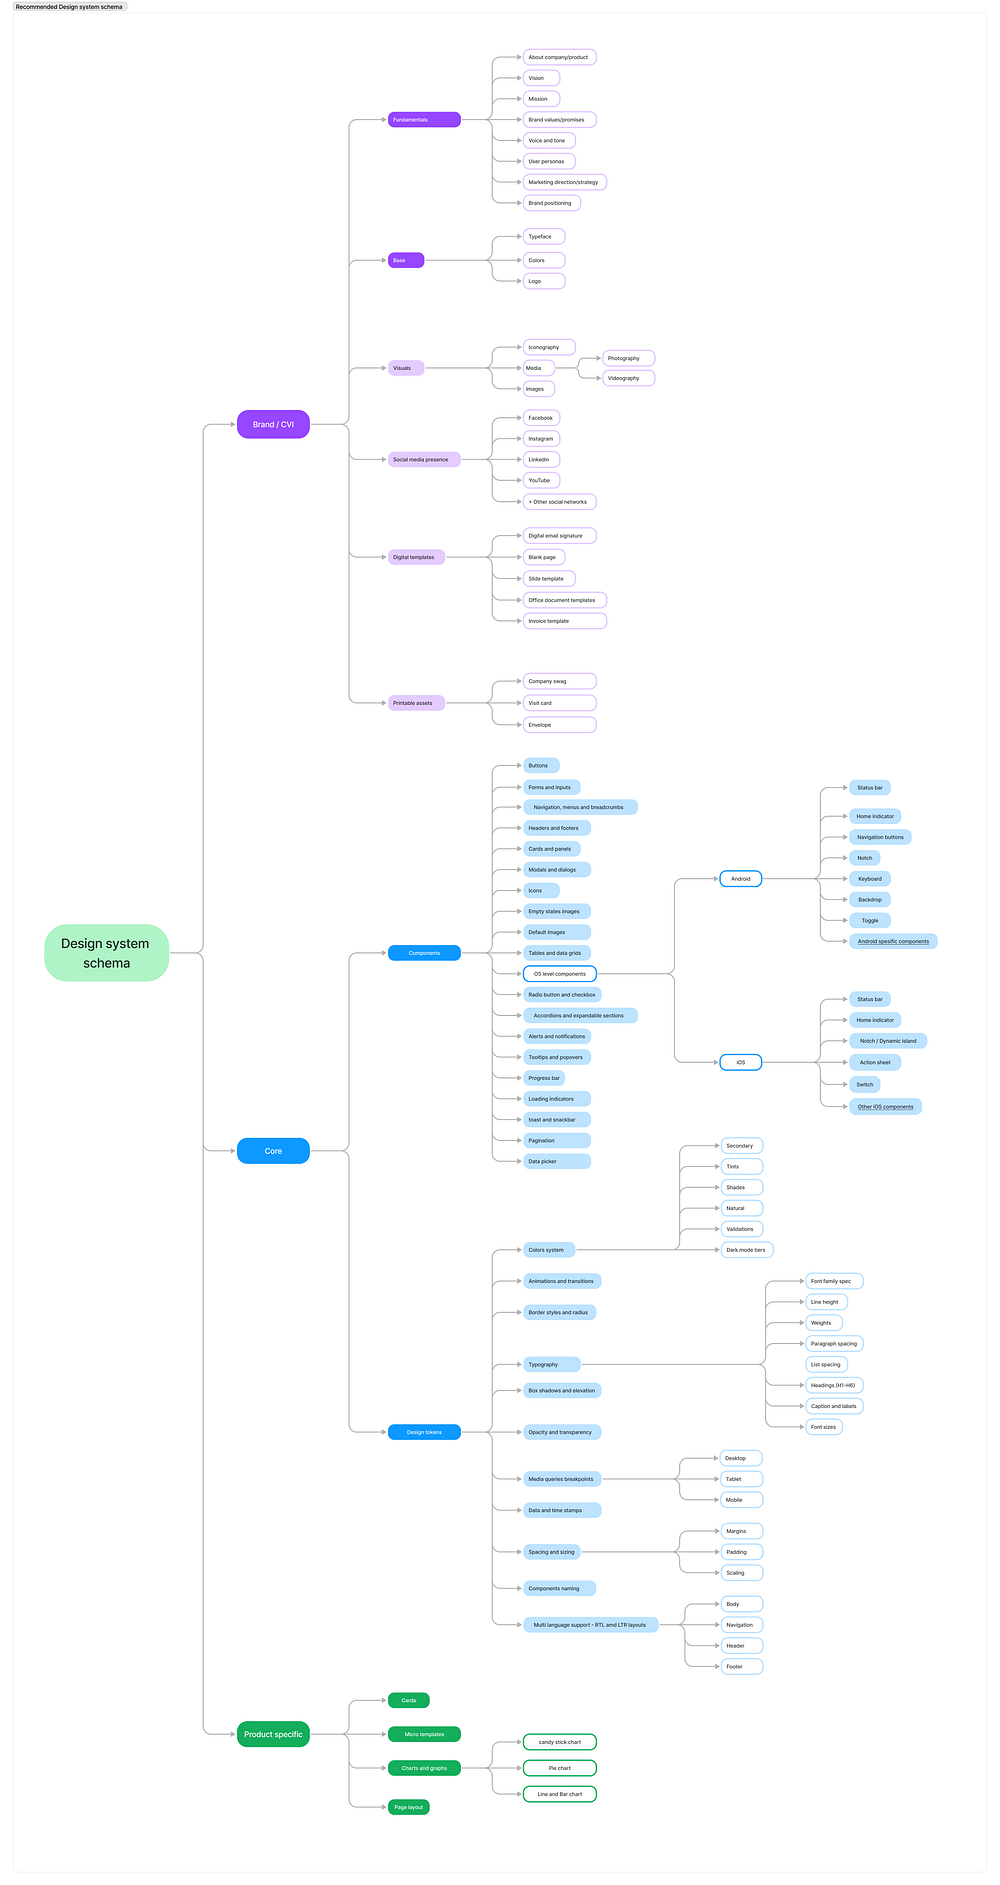
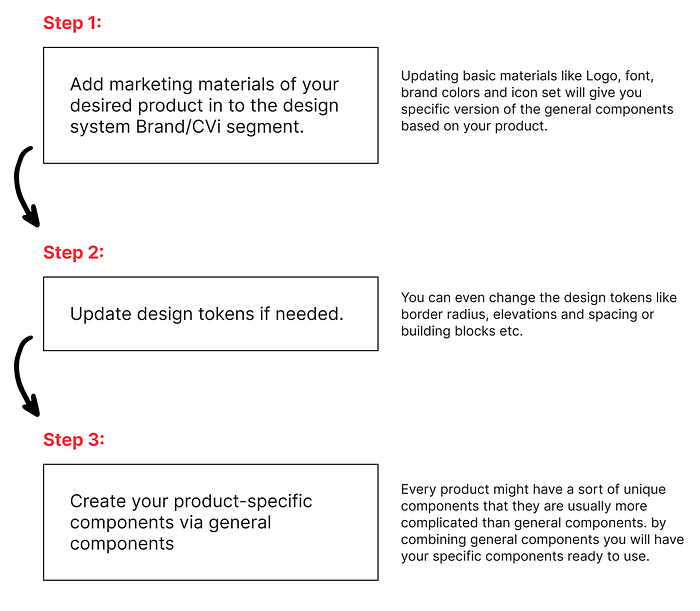
Although we had this schema in the first place and I start shaping the design system according to that ⎯ during the process, we made some changes to make it more flexible and comprehensive. Based on this structure, to apply the design system to each product we need to move through the following procedure:
✧ How a single component structure should be?
There were five different things I considered while creating a component — I added examples to make it more tangible.
The component variations
I defined my components using the components set and components property functions to ensure I took into account all states and types.
Every component might have a selection of the following properties:
- Theme: Dark, Light
- Size: Small, Medium, Large
- Components Type: E.g. Primary, Secondary and etc.
- States: E.g. Enable, Disable, Hover and etc.
Components might have some other components inside, So I controlled them by Insanse swap to reach more flexibility.
Different states for different situations
I defined my components using the components set and components properties to ensure I took into account all states and types and variations.

Documentation
Although the documentation is vital but it's time-consuming. I researched Figma plugins for automated documentation and I found a very good one.
As a shortcut, I used EightShapes Specs, and I saved lots of time.
Through this Figma plugin, you can get a document for three major parts:
Anatomy, Properties, and Layout including constraints.
Examples:
Documentation for List item component via EightShapes Specs, Figma Plugin.
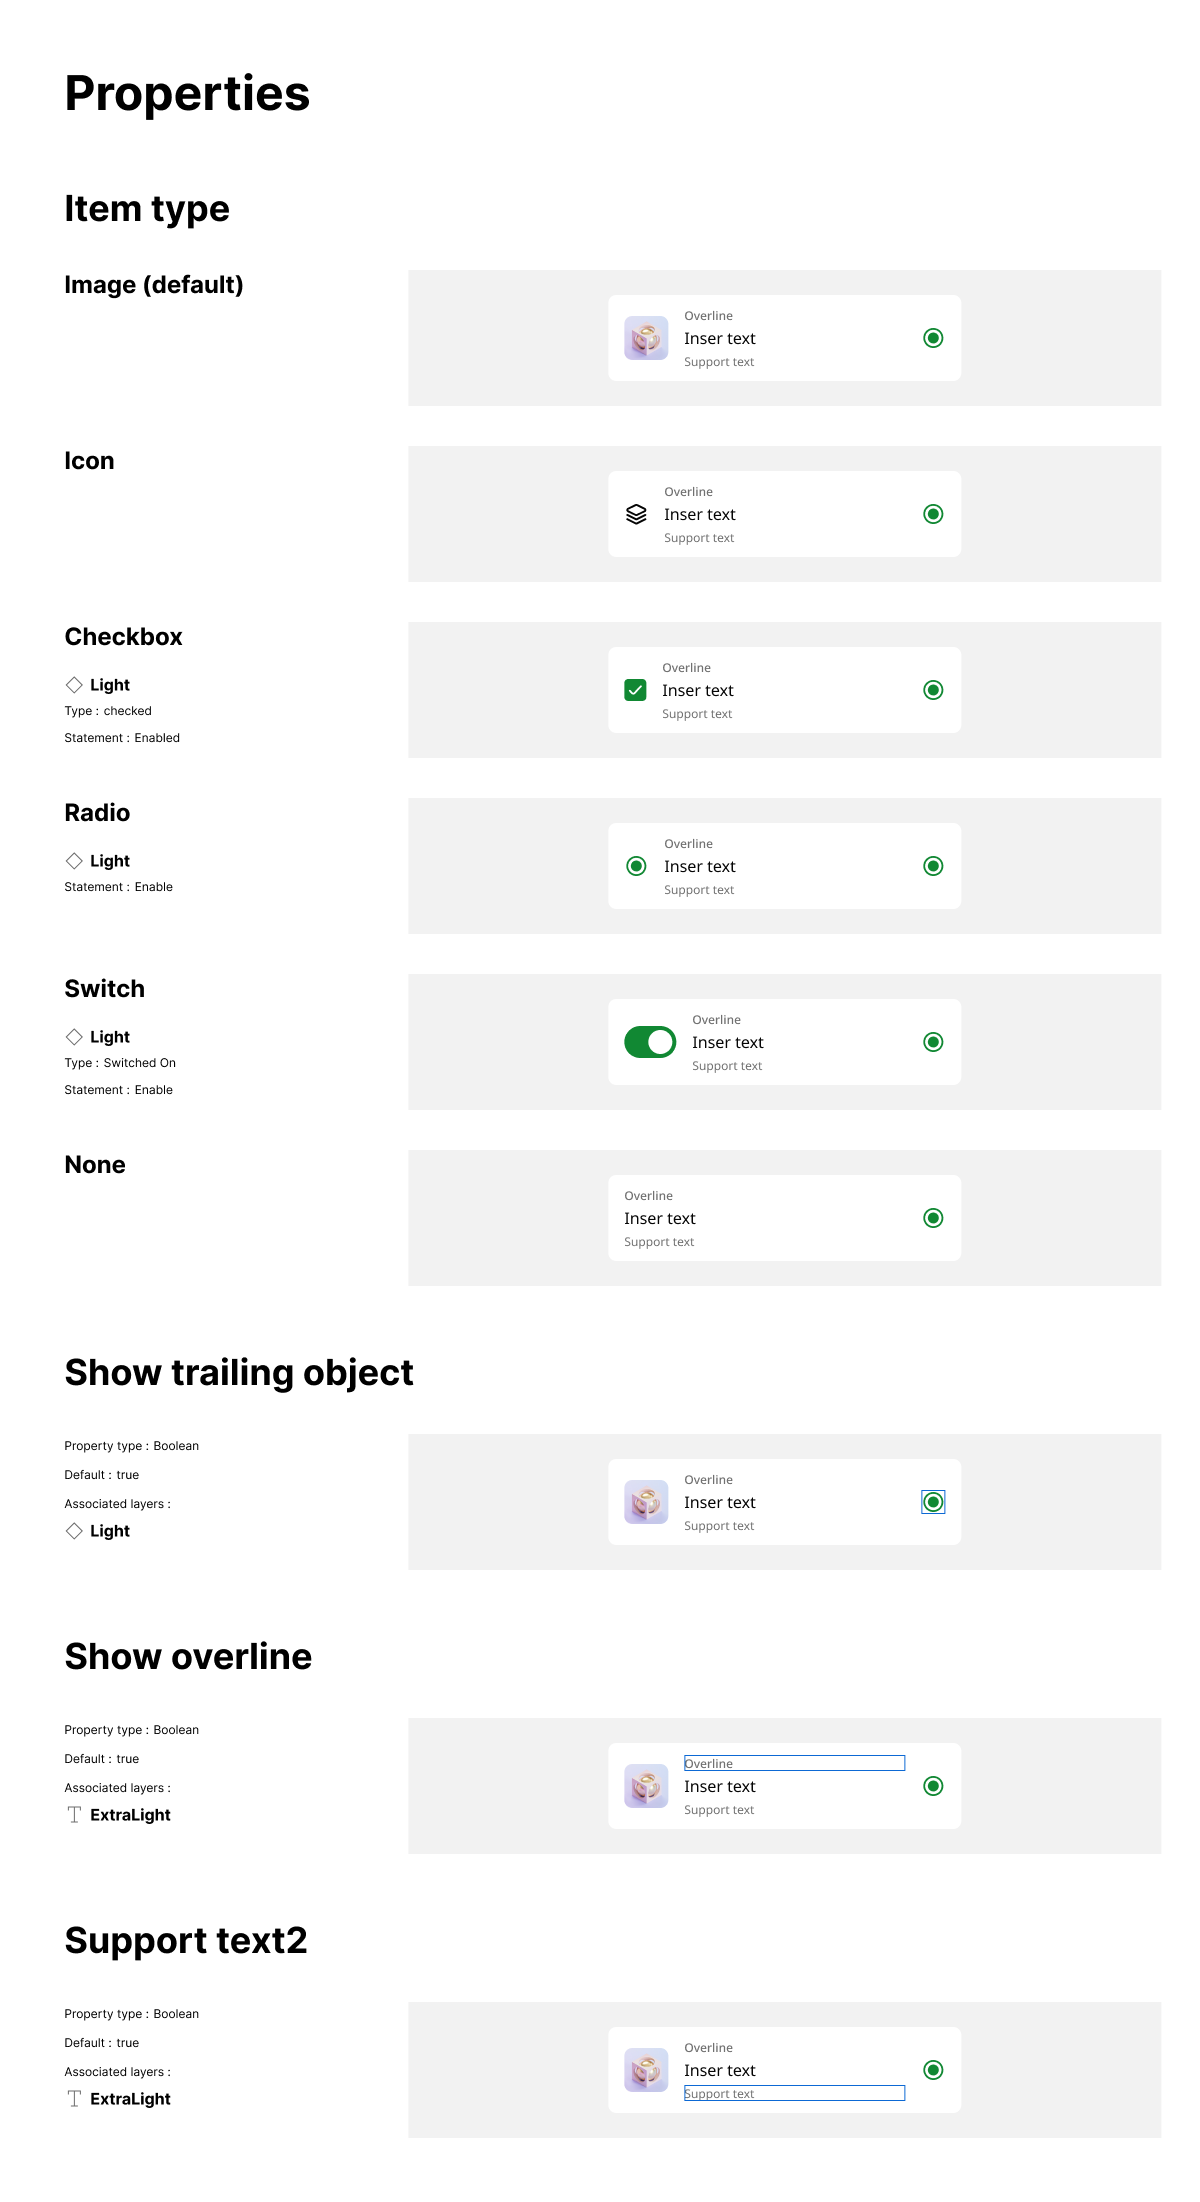
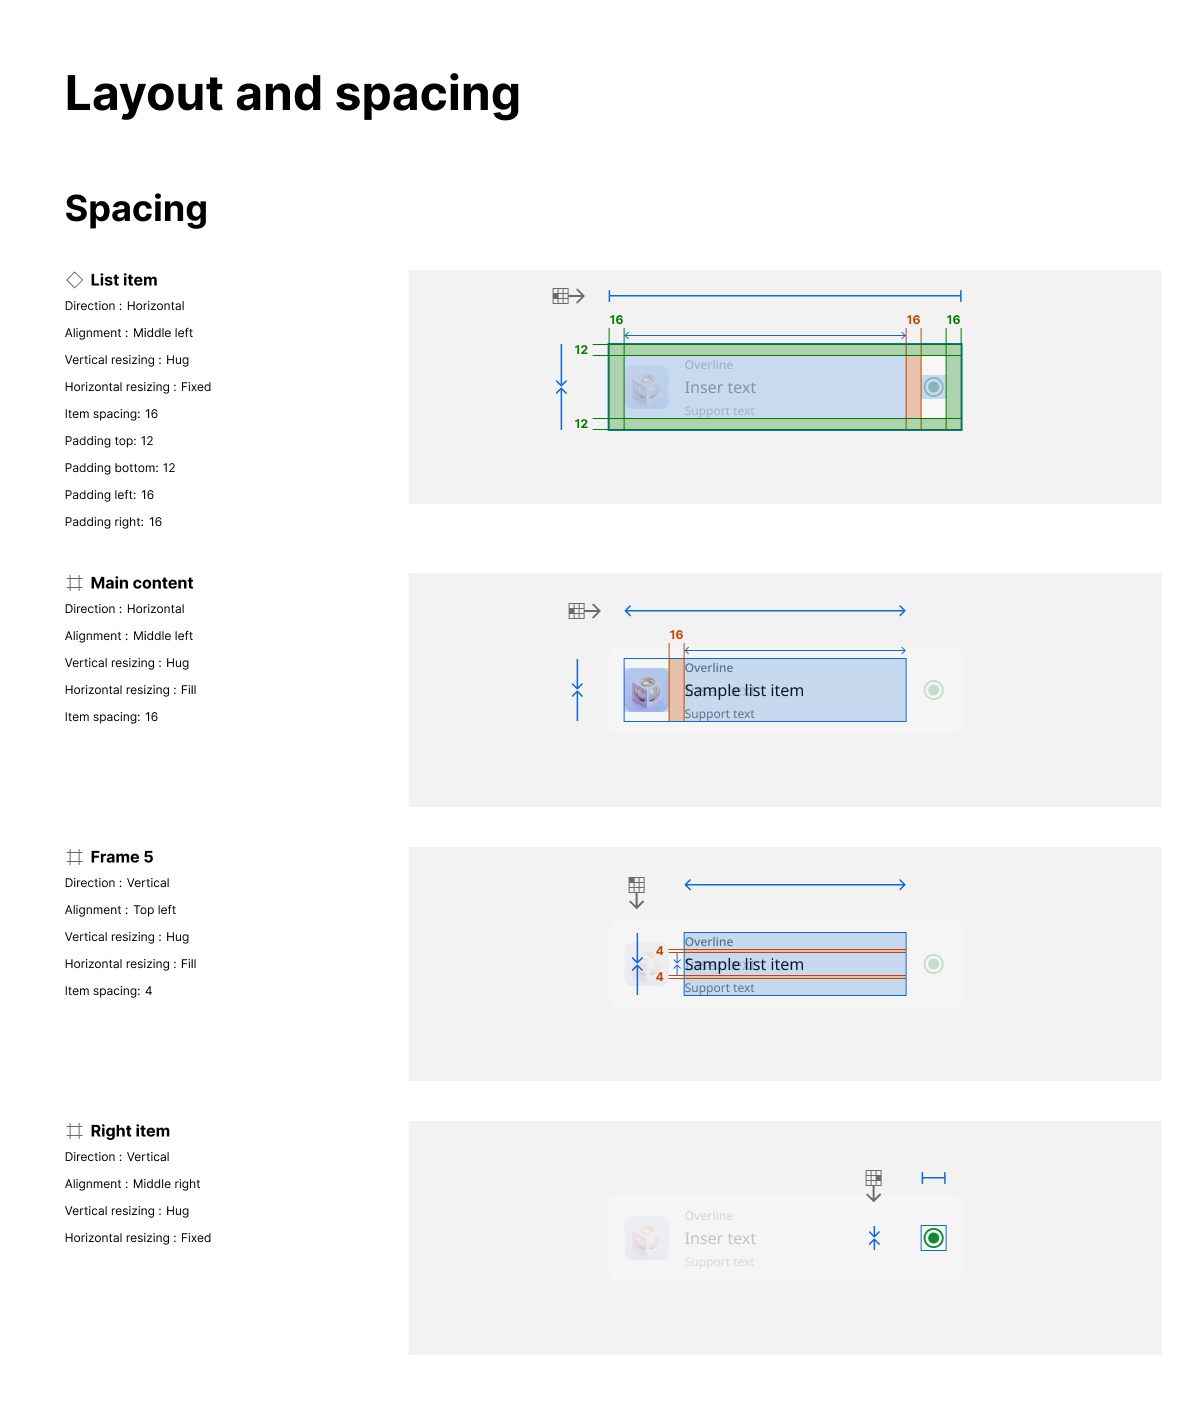
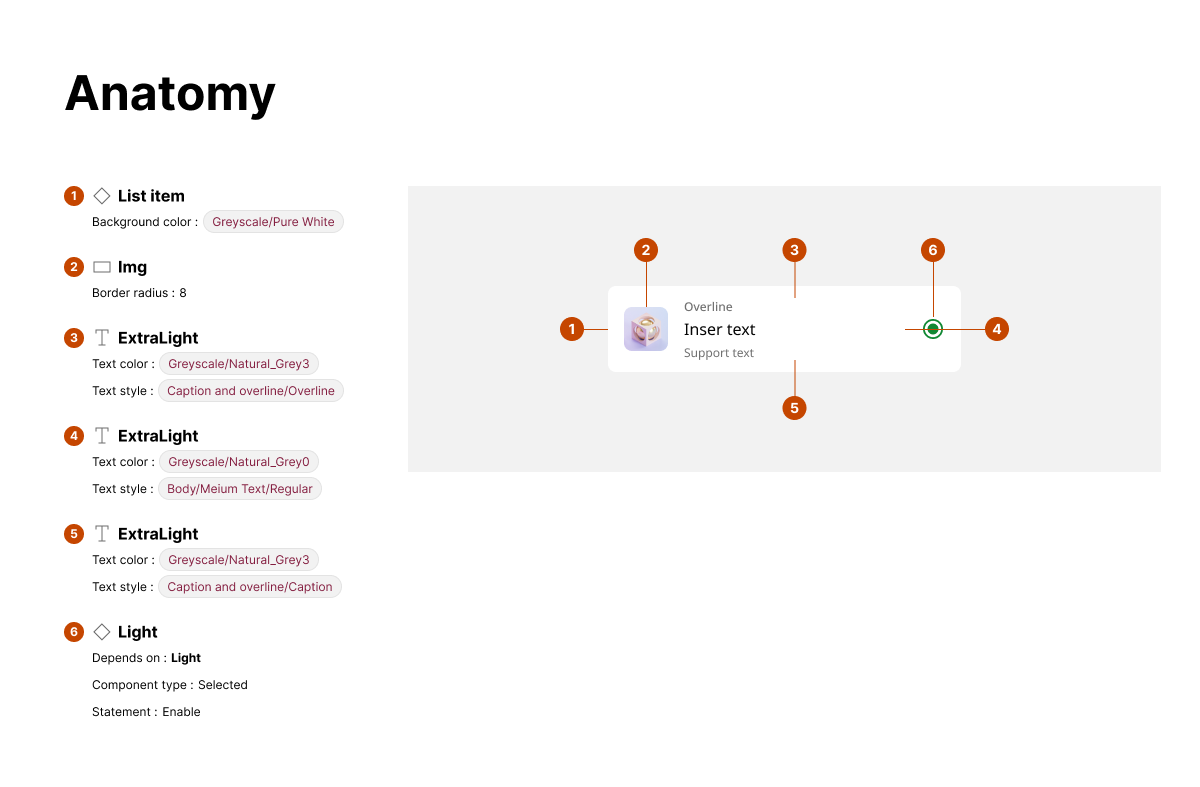
Also, documentation might include codes or instructions for using more complicated components.
Accessibility test (if it's required)
To make sure your components work perfectly for all different groups of people, It is necessary to test your components via accessibility plugins in the Figma community.
What kinda test?
- Touchable area test
- Text size and contrast test
- Colorblind compatibility test
- Color Contrast test
Prototype to show micro-interactions
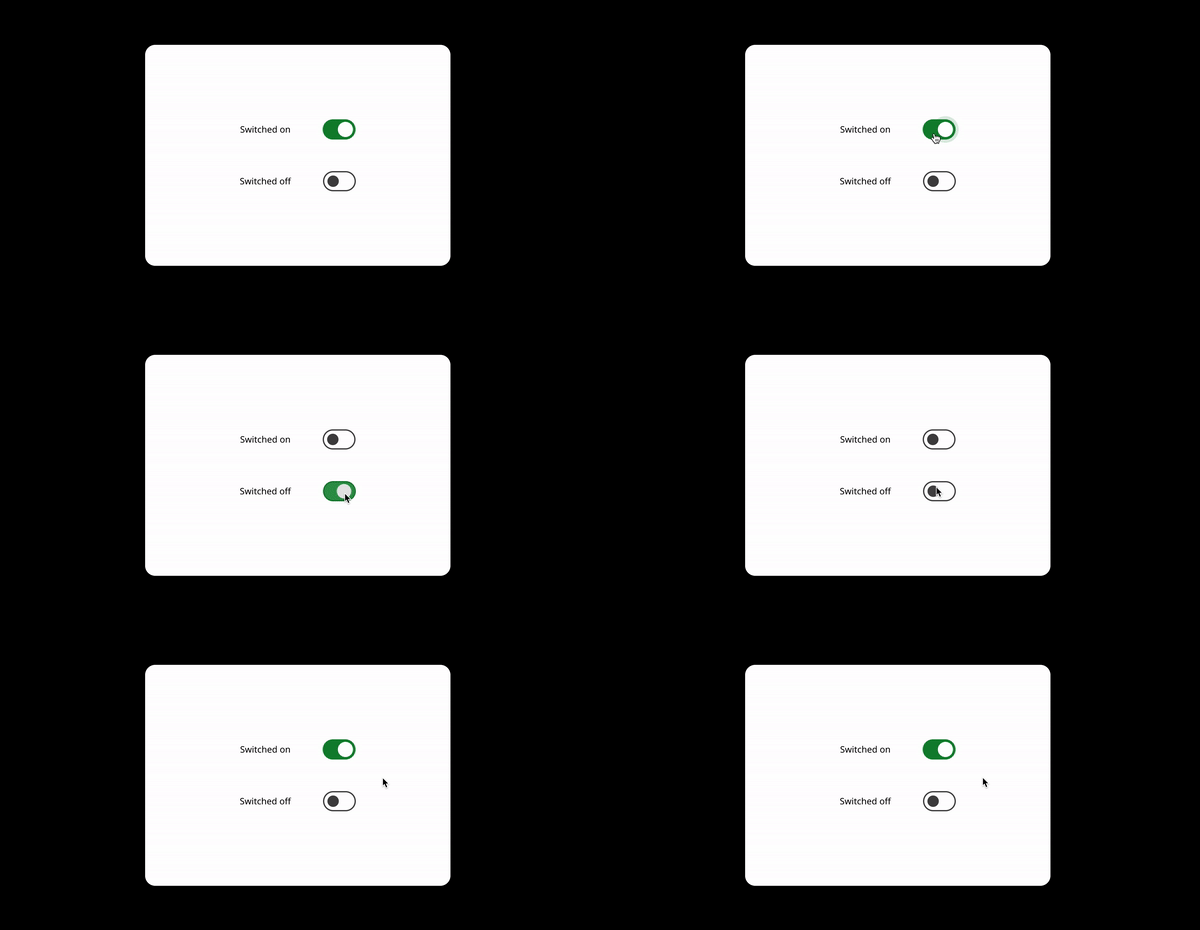
You can add micro-interactions to your components, and wherever you use those components they inherit the interactivity. Additionally, it is very helpful to developers to understand the actual motions and functionality of the components in different situations.
Example: Switch component.
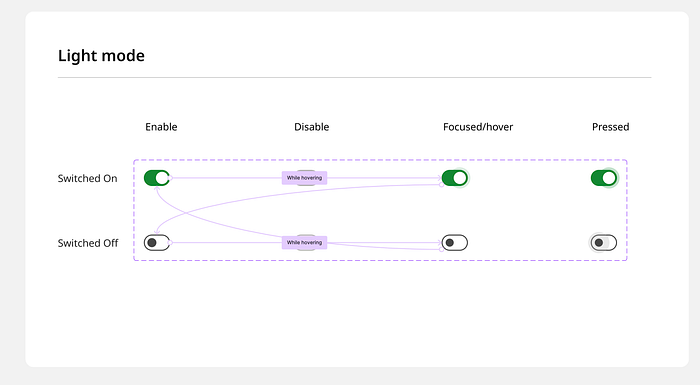
And the result when you use the component would be like this:
Code snippet.
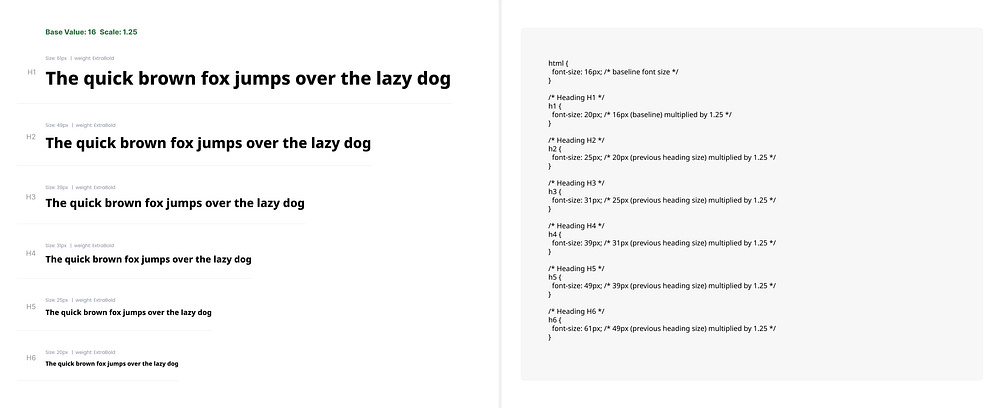
It's totally Depends on how the dev side documentation going to be but in General, the Design system should have documents for using and maintaining components and structure for both designers and Developers. There is a big advantage to having designers with development skills and developers with a solid understanding of design inside your design system team.
Example:
The Result
I named the design system Synapse
What does that mean?!
The space between the end of a nerve cell and another cell. A Synapse is a junction between two neurons. It is a physiological continuity between two nerve cells. It serves as the structural basis of communication between the neurons. Every brain activity depends on the Synapse!
You can have access to the bata(limited) version of Synapse through the following link.
Online preview:
https://app.figmayo.com/sites/LzOFH2n-2/
Please share your feedback :)
The Conclusion
I caught up with new trends in creating a design system in Figma. There are still a lot of improvements to be made. For the next iteration, I already have some ideas to fill the gaps.
Even though we haven’t fully utilized this design system yet, we have already received a lot of positive feedback from designers and developers who will be using it. In business terms, we expect to save about 40% of our designer's and developers’ time by using the design system, allowing them to focus on other projects and challenges.
In the future, I will share actual statistics about the impact of this project.
Thank you for your time.
Please don’t hesitate to share your thought in the comment section.
